A reader asked me if I knew how to make photo album pages like this one by Umbra.
I hadn't seen that design before, but it looked pretty easy to replicate. The pop up mechanism is a kind of floating tabletop.
I decided to try this design on a smaller scale. I'm guessing that the photo album pages are about 12" square, designed to accommodate eight 4"x6" photos on the two page spread. For a card, try making it half size--with each half of the card 6" square. Your photos should be printed 2"x3".
How to make a pop up photo album card
Cut out the following pieces from card stock:
--base card, 12" x 6", folded in half so each side is 6" square
--4 rectangles, 2"x3"
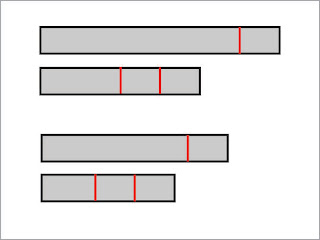
--2 strips: 1/2" wide, 4.5" long
--2 strips: 1/2" wide, 3" long
--2 strips: 1/2" wide, 3.5" long
--2 strips: 1/2" wide, 2.5" long
On the 4.5" and 3.5" strips measure and mark .75" from one end of the strip. Score across the strips at the mark and crease the strips.
On the 3" and 2.5" strips measure and mark 1.5" and .75" from one end of the strip. Score and crease at both these marks.
Assemble landscape photo base (make 2)
Turn rectangle to landscape orientation. Place a 4.5" strip horizontally across the center of rectangle. Line up the long uncreased end with the left edge of the rectangle and glue.
Abut the bottom of a 3" strip to the top edge of the strip you just glued. The 3" strip is creased into three sections. Make sure the strip is turned so the longer section is to the right and the shorter sections to the left. Align the end of the strip with the right hand edge of the rectangle. Glue the strip to the rectangle.
Assemble portrait photo base (make 2)
Refer to photo and make these in a similar fashion. Notice that the 3.5" strip is glued along the top edge of the rectangle (not the center), and the 2.5" strip directly below it.
Lay out the photo bases on the card as shown. Take care to leave a little gap between the edges of the photo bases and the top and bottom edges of the card. Also leave a little gap between the photo bases. (Indicated by red arrows).
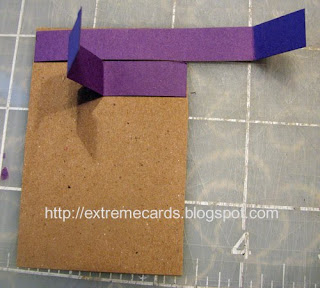
Spread glue on the back of the creased strip sections nearest the card fold, gluing the ends of the strips to the card. (I have outlined in yellow the sections that will be glued to the card.)
Allow for some drying time here.
Flip the photo bases into position. Be sure your glue is sufficiently dry, as you will have to manipulate the bases a bit to get them to bypass each other. Start by flipping the bottom base to the left. (The picture was taken at this point.) Pull the two in the middle toward each other, and twist them around each other as needed to get them to flip across. Then flip the top one, sliding it under the portrait base that is partially on top of it.
When you are done it should look like this.
Now you will glue the loose ends of the strips.
Partially close the card, collapsing all of the photo bases to one side. Fold the strips ends down, toward the center fold of the card. You want to fold the strips on the second crease in from the end.
Spread glue on the strip, but only between the end of the strip and the first crease. Still holding the card partially open, check that the card bases and strips aren't crooked. Close the card. Flip the card over, partially open it and glue the other two strips. Close the card and weigh it down until it dries.

|

|
| Left side | Right side |
Finish by gluing your photos to the photo bases and to the card (shown as blue rectangles).
A variation, with square and rectangular photos
Extreme Cards and Papercrafting: pop up cards, movable and mechanical cards, digital crafts and unusual papercrafts.


