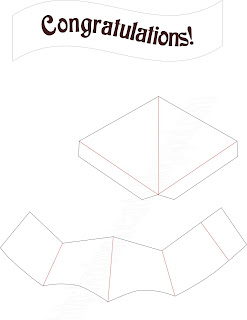
How to make this V-fold graduation cap pop up card

Download files: PDF, Silhouette Studio (print and cut), SVG
(How to use my files in Cricut Design Space)
Files download for free; pay what you wish for the tutorial and to support this site. Suggested contribution for this project is $1.00.
Print banner if desired. Cut out board and cap on black lines. Score on red lines.
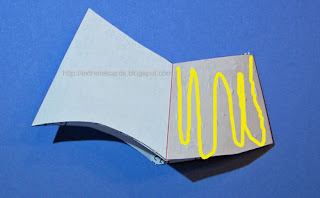
Crease board in half at center line. Crease tabs as shown.
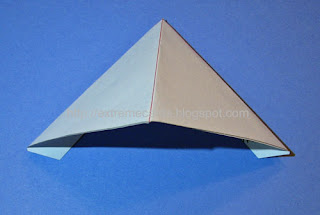
Assemble cap. Fold cap in half at front. Glue together at back, overlapping tab.


Cut base card. I used half of an 8.5" x 11" sheet of card stock.
Fold board in half at center line. Lay on base card. Be sure the top of the triangle does not extend past the top of the card.
Slide the triangle to meet the center fold of the base card. Mark the point of intersection.

Draw a line perpendicular to the center fold of the base card at the marked point.

Spread glue on the tab that will go on the right-hand side of the card. Fold the tab under and line up the edge of the board piece with the line you drew. Be sure the point of the board is right on the center fold of the card base.

Flip the board piece up.

Spread glue on the back half of the cap, both sides.
Lay cap on top of board tab. Align the top of the cap with the fold line of the board. Align the back of the cap with the center fold line of the card.


Refold board along its center. Spread glue on the tab that will attach to the left-hand side of the card.

Close the card. Put a book on it and let it dry completely.


Finish with a paper button, a tassel, and banner.


Download files: PDF, Silhouette Studio (print and cut), SVG
(How to use my files in Cricut Design Space)
Files download for free; pay what you wish for the tutorial and to support this site. Suggested contribution for this project is $1.00.
Print banner if desired. Cut out board and cap on black lines. Score on red lines.

Crease board in half at center line. Crease tabs as shown.

Assemble cap. Fold cap in half at front. Glue together at back, overlapping tab.


Cut base card. I used half of an 8.5" x 11" sheet of card stock.
Fold board in half at center line. Lay on base card. Be sure the top of the triangle does not extend past the top of the card.
Slide the triangle to meet the center fold of the base card. Mark the point of intersection.

Draw a line perpendicular to the center fold of the base card at the marked point.

Spread glue on the tab that will go on the right-hand side of the card. Fold the tab under and line up the edge of the board piece with the line you drew. Be sure the point of the board is right on the center fold of the card base.

Flip the board piece up.

Spread glue on the back half of the cap, both sides.

Lay cap on top of board tab. Align the top of the cap with the fold line of the board. Align the back of the cap with the center fold line of the card.


Refold board along its center. Spread glue on the tab that will attach to the left-hand side of the card.

Close the card. Put a book on it and let it dry completely.


Finish with a paper button, a tassel, and banner.
