Building a Better Center Post Cake
Start by reading Building a Better Pop Up Cake: Part 1.

Stampin' Up has a very good video of the Pop Up Cake Die assembly. I suggest viewing it first to get an overview of the assembly process. Bear in mind that my instructions differ on several key points.
Download the template set (PDF, Silhouette Studio, DXF) and use "centerpost" files. (personal use only!). If you are printing from the PDF directly on your "good" paper, print on the wrong side of the paper.
Thanks to Pooja Gandhi for the SCUT file!
(Just in case you're wondering about copyright...I did not copy the pattern from the die. I did borrow the idea of the center post.)
Making the center post pop up cake design
--Assemble the center post--
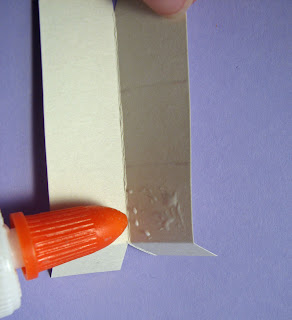
Difference from the Sizzix design: the center post is double wide and then folded and glued together to make it more rigid.
Cut out the center post. Score the center crease and the bottom feet.

Fold the center post in half. Spread out the feet. Glue the post halves together just above the feet.
Cut the slits in the center post. Score fold lines.

--Add the cake layers--
Score fold lines on the cake layers before cutting them out. Cut slots on each layer.
Cut out the cake layer circles with attached legs.
Difference from the Sizzix design: the pieces are aligned with the grain of the paper. You get a better crease if your pieces are not cut diagonally on the paper.
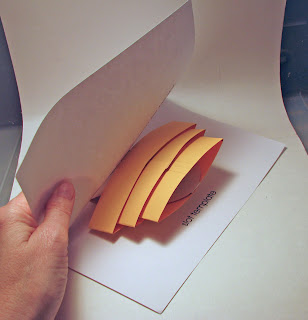
Fold the circles in half toward the front, then unfold. On the same crease fold toward the back, then unfold. Crushing the fibers in both directions helps the cake unfold when the card is opened.


Crease the fold lines on the legs.

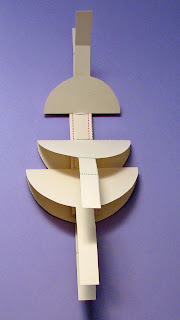
Start stacking the layers on the center post.
Fold in the edges of the center post to allow the post to slip through the slits in the cake layers.

Slide the largest layer onto the post. Unfold the side tabs to hold it in place.

Repeat with the middle and top layers.


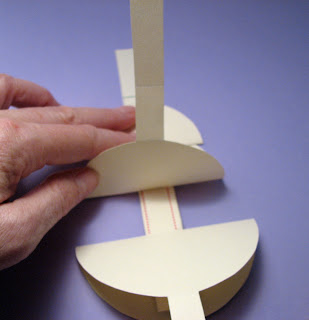
--Adjusting leg length--
Before gluing the cake layer legs in place, it's a good idea to check to make sure they aren't just a tiny bit too long.
Flip the top layer up, away from the base (feet) of the center post.
Fold the leg of the top layer down toward the middle layer. See if the end of the leg overlaps the fold line.

If it does, trim off the overlap.

Flip the middle layer up and repeat: fold leg down, check for overlap, trim.
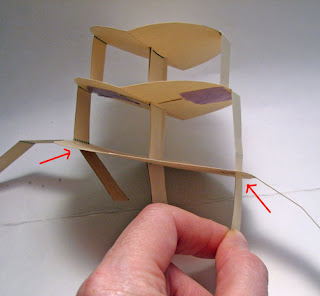
Flip the bottom layer up. Check for overlap at the crease of the post feet, trim.

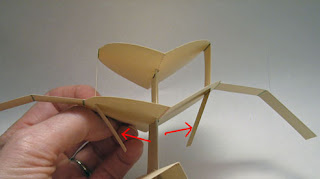
--Slotting legs into place--
Difference from the Sizzix design: no matter how carefully you adhere the legs to the tops of the layers, there tends to be strain and separation at the join, causing the cake layers not to pull up completely. Slotting the legs through the cake tops gives better pull.
See the cake here, for example. You can see the the separation where the middle tier meets the top of the bottom tier.
Slot legs of top tier through the middle tier by sliding each leg through a side slot.

Pull the legs through until the end of the leg meets the center post. Adjust so the bend of each leg is right at the slot. (It's okay if the leg end is not all the way to the center post).
Spread glue on just the bottom bend of the leg, on the side facing the middle layer.
Collapse the layers with the top and middle layer up. Push the glue covered leg down and adhere.


Reinforce slot by taping the leg to the underside of the middle layer, right across the slot.

Repeat for other leg.
Repeat to attach the middle tier legs to the bottom tier. Insert legs through slots in large layer, adjust length, glue, reinforce.

--Attach cake to card base--
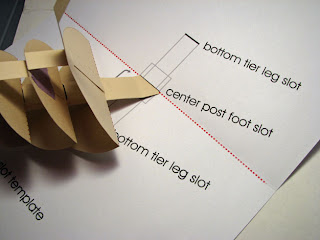
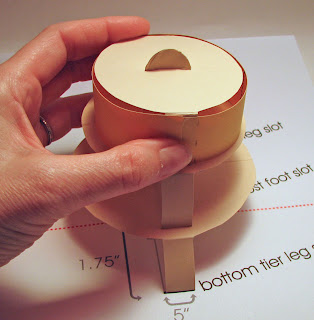
Using the template, cut slots in your base card.
Slide the post feet through the middle slot (on the card fold).
Flip the base card over.
Open out the feet a little and apply glue to the top of the feet--the part facing the base card. Glue the feet to the card, making sure the fold line is right at the slot.


Slide the legs of the bottom tier through the side slots of the card.

Pull the legs through and adjust so the bend is right at the slot, as you did with the other layers.

Apply glue to the leg on the side facing the card and attach to card. Tape across leg and slot to reinforce.

Close card and allow to dry. I like to put a weight on it and leave it for an hour or so.
--Assemble cake sides--
Cut out side strips.
Difference from the Sizzix design: in the video the crafter just eyeballed where to place the cake sides. I prefer having guidelines to line up with the uprights.
Pop the cake completely open. Anchor the card base sides if necessary to keep the card in the fully open position.

I strongly advise using double sided tape, not glue, to attach the cake sides.
Attach the cake sides starting with the top tier.
Apply double sided tape to the shaded area in the center of the strip. Affix the cake strip to one upright, aligning the upright with the shaded area (and the tape).

Apply tape to the shaded area at one end of the strip. Wrap the taped end of the cake side around the cake layer. Match shaded area at the end of the strip to the upright and affix.

Apply tape to the shaded area at the other end of the cake strip. Wrap this end of the cake strip around cake top, align shaded area with upright. Affix on top of the other end of the strip.
Repeat for the middle tier.
The bottom tier is constructed in two parts. Apply tape to the shaded areas on each piece. Affix one to an upright, wrap and affix to the other upright. Repeat for the other half of the cake. You will have a seam on each upright.
And hey, just as an aside. You do know that all those beautifully round Sizzix cakes were photographed before they were folded, right? That in real life they don't look like that out of the envelope?
Compare this
...to this
Moving on....
Close card gently. This will create the folds in the cake sides.
Decorate the outside of the card to cover the parts that are slotted through the base card.
Start by reading Building a Better Pop Up Cake: Part 1.

Stampin' Up has a very good video of the Pop Up Cake Die assembly. I suggest viewing it first to get an overview of the assembly process. Bear in mind that my instructions differ on several key points.
Download the template set (PDF, Silhouette Studio, DXF) and use "centerpost" files. (personal use only!). If you are printing from the PDF directly on your "good" paper, print on the wrong side of the paper.
Thanks to Pooja Gandhi for the SCUT file!
(Just in case you're wondering about copyright...I did not copy the pattern from the die. I did borrow the idea of the center post.)
Making the center post pop up cake design
--Assemble the center post--
Difference from the Sizzix design: the center post is double wide and then folded and glued together to make it more rigid.
Cut out the center post. Score the center crease and the bottom feet.

Fold the center post in half. Spread out the feet. Glue the post halves together just above the feet.

Cut the slits in the center post. Score fold lines.

--Add the cake layers--
Score fold lines on the cake layers before cutting them out. Cut slots on each layer.
Cut out the cake layer circles with attached legs.
Difference from the Sizzix design: the pieces are aligned with the grain of the paper. You get a better crease if your pieces are not cut diagonally on the paper.
Fold the circles in half toward the front, then unfold. On the same crease fold toward the back, then unfold. Crushing the fibers in both directions helps the cake unfold when the card is opened.


Crease the fold lines on the legs.

Start stacking the layers on the center post.
Fold in the edges of the center post to allow the post to slip through the slits in the cake layers.

Slide the largest layer onto the post. Unfold the side tabs to hold it in place.

Repeat with the middle and top layers.


--Adjusting leg length--
Before gluing the cake layer legs in place, it's a good idea to check to make sure they aren't just a tiny bit too long.
Flip the top layer up, away from the base (feet) of the center post.

Fold the leg of the top layer down toward the middle layer. See if the end of the leg overlaps the fold line.

If it does, trim off the overlap.

Flip the middle layer up and repeat: fold leg down, check for overlap, trim.

Flip the bottom layer up. Check for overlap at the crease of the post feet, trim.

--Slotting legs into place--
Difference from the Sizzix design: no matter how carefully you adhere the legs to the tops of the layers, there tends to be strain and separation at the join, causing the cake layers not to pull up completely. Slotting the legs through the cake tops gives better pull.
See the cake here, for example. You can see the the separation where the middle tier meets the top of the bottom tier.
Slot legs of top tier through the middle tier by sliding each leg through a side slot.

Pull the legs through until the end of the leg meets the center post. Adjust so the bend of each leg is right at the slot. (It's okay if the leg end is not all the way to the center post).
Spread glue on just the bottom bend of the leg, on the side facing the middle layer.

Collapse the layers with the top and middle layer up. Push the glue covered leg down and adhere.


Reinforce slot by taping the leg to the underside of the middle layer, right across the slot.

Repeat for other leg.
Repeat to attach the middle tier legs to the bottom tier. Insert legs through slots in large layer, adjust length, glue, reinforce.


--Attach cake to card base--
Using the template, cut slots in your base card.
Slide the post feet through the middle slot (on the card fold).

Flip the base card over.
Open out the feet a little and apply glue to the top of the feet--the part facing the base card. Glue the feet to the card, making sure the fold line is right at the slot.


Slide the legs of the bottom tier through the side slots of the card.

Pull the legs through and adjust so the bend is right at the slot, as you did with the other layers.

Apply glue to the leg on the side facing the card and attach to card. Tape across leg and slot to reinforce.

Close card and allow to dry. I like to put a weight on it and leave it for an hour or so.
--Assemble cake sides--
Cut out side strips.
Difference from the Sizzix design: in the video the crafter just eyeballed where to place the cake sides. I prefer having guidelines to line up with the uprights.
Pop the cake completely open. Anchor the card base sides if necessary to keep the card in the fully open position.

I strongly advise using double sided tape, not glue, to attach the cake sides.
Attach the cake sides starting with the top tier.
Apply double sided tape to the shaded area in the center of the strip. Affix the cake strip to one upright, aligning the upright with the shaded area (and the tape).

Apply tape to the shaded area at one end of the strip. Wrap the taped end of the cake side around the cake layer. Match shaded area at the end of the strip to the upright and affix.

Apply tape to the shaded area at the other end of the cake strip. Wrap this end of the cake strip around cake top, align shaded area with upright. Affix on top of the other end of the strip.

Repeat for the middle tier.
The bottom tier is constructed in two parts. Apply tape to the shaded areas on each piece. Affix one to an upright, wrap and affix to the other upright. Repeat for the other half of the cake. You will have a seam on each upright.
And hey, just as an aside. You do know that all those beautifully round Sizzix cakes were photographed before they were folded, right? That in real life they don't look like that out of the envelope?
Compare this

...to this

Moving on....
Close card gently. This will create the folds in the cake sides.

Decorate the outside of the card to cover the parts that are slotted through the base card.